Bevel
Table of Contents
For Blender 2.8+ and newer versions Bevel (the tool) is functionally the same as for previous versions but is now accessed from a slightly different location depending on the context of use, per the general reorganisation of the interface.
Design note: in this context, ‘bevel’ refers to the tool, not specifically the outcome (rounded edges/corners).
Bevel (tool)
There are a number of ways to bevel an object, rounding, smoothing or curving its edges and/or corners. For selective application this is generally done using Bevel Edges and/or Bevel Vertices on specific edge or vertex selections in Edit Mode, with each affecting the selection depending on it being an individual element or group (one edge versus a group of edges).
Design note: bevelling a face, flat plain or contiguous surface basically creates an ‘inset’ not a bevel, the latter requiring some degree of edge or corner to work, hence there being no ‘Bevel Faces‘ option.

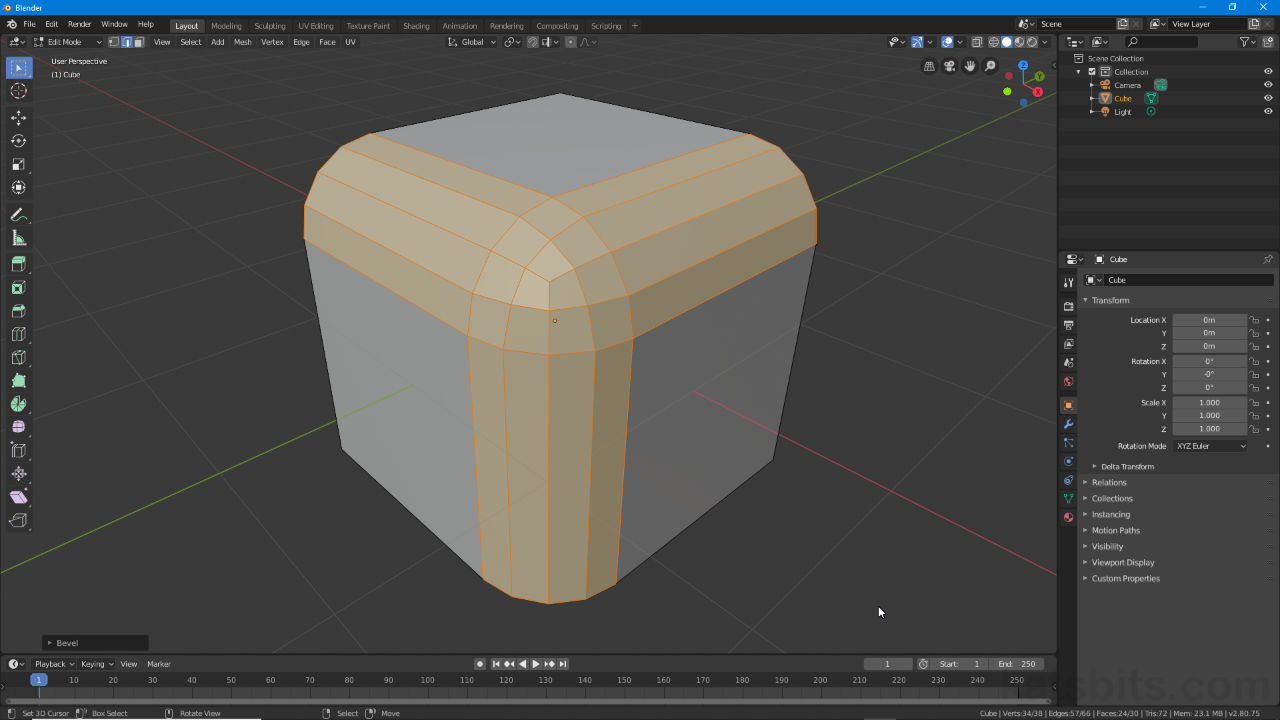
The default Cube with edges and corner vertices separately bevelled, highlighting the different between the two operations in Blender 2.8+.
Bevel Edges
To modify the mesh using the Bevel tool, in the 3D View select an object (or objects) to be affected and toggle into Edit Mode (Tab). To bevel an edge (or edges) switch to Edge Select mode and make a selection (Shift + click to multi-select) then from the Edge menu click Bevel Edges (or press Ctrl + B) – Edges » Bevel Edges. The interactive guide will appear (a dashed line); move the mouse away from the object to increase, or towards to reduce, the area influenced by the tool, and/or scroll the middle-mouse button up to increase (or press Numpad +), or down to reduce (or press Numpad –), the number of subdivisions distributed across the selected distance. Click to apply (or press Enter).
Design note: for greater precision, once Bevel has been activated type a number, either as a whole value or one that includes decimal placement, i.e. 100 or 9.75 (Unit of Measurement may influence the degree to which bevel applies) – when typing, Backspace can be used to clear input for re-entry/typing.
Important: both Bevel Edges and Bevel Vertices being selection based meaning, the degree to which structure modifies being dependent upon, and strictly limited to, those elements selected at time of use. Subsequent selections, those made after the fact, may not change the same structure as expected due to the way modified and unmodified elements intersect. As a result care should be taken to ensure appropriate selections are being made prior to using the tool to avoid awkward structures that can then be difficult to resolve.
It’s not possible to bevel another element and have the result match the same had all elements been modified at the same time – shown above for example, corner structures differ depending on whether edges are changed at the same time (right), or in a number of passes (left).


Default cube in Edit Mode with edges (all) bevelled using Bevel Edges (shown inset 0.5 – typed input, with 3 subdivisions – Numpad +).
Bevel Vertices
To bevel vertices; in Edit Mode (Tab) make a selection (Shift + click to multi-select) then upper-right of the 3D View click the Vertex menu, and Bevel Vertices (or press Shift + Ctrl + B) – Vertex » Bevel Vertices. The interactive tool will appear (dashed line) where the mouse cursor is moved away from the selection to increase, or towards it to decrease, the area influenced by the tool, and the amount of subdivisions used is set scrolling the middle-mouse button up to increase (or press Numpad +), or down to reduce (or press Numpad –), the amount to structure added. Click to apply (or press Enter).
Design note: to cancel bevel once initiated press Esc or right-click anywhere on screen.

Default cube in Edit Mode with (all) corner vertices bevelled using Bevel Vertices (shown inset 0.75 – typed input, with 3 subdivisions – Numpad +).
Bevel Modifier
As an alternative to using selectively applied Bevel in Edit Mode, the effect can be applied globally to en entire object using the Generative modifier, Bevel, in Object Mode which, depending on the type of object, may be a more flexible approach to producing rounded edges and corners. To bevel using the modifier, select the object and in the Modifiers properties panel click Add Modifier then select Bevel from the Generate list of options. For simple bevel effects, rounding edges for example, adjust Width and Segments to increase/decrease the area affected and the number of subdivisions used.
Design note: the Bevel modifier can be controlled using Angle, Weight, Vertex Group and other settings (beyond the scope of discussion here), that change the effects appearance, its severity and/or distribution, on the selected object.

Objects can be bevelled using the Bevel Modifier in Object Mode – for simple bevelling Width and Segments correspond to the Bevel tool and how that alters edges and vertices in Edit Mode.
Blender 2.9+ & Bevel
For Blender 2.9+ and possibly future releases (Blender 3.x+, 4.x+ et al), Bevel functions the same as for previous versions with the exception that the Apply button normally associated with fixing or making real the modifiers function or property may be presented as a menu option in the Modifiers header instead of a distinct button labelled Apply. To apply something in Blender 2.9+ then, in the modifier click the down arrow, V, in the Header (indicated below) and select Apply from the list shown – V » Apply (Ctrl + A still functions).

The Apply button may not be displayed for Blender 2.9+ or future release and instead accessible as a menu option in the Modifiers header.
