Eevee & Light Emitting Materials
Table of Contents
Self-illuminating or light emitting materials are relatively straightforward to set up in Blender. However, depending on the end result there are a number of ways this can be done, using the default Principled BSDF node, an Emission node, or using a Light Probe, especially if the light emitted is to affect neighbouring objects in the surrounding environment, something Eevee materials don’t do by default. The following then, is a look at the basics of creating light emitting materials for Eevee.
Important: as a compromise for real-time rendering, Eevee does not render sources of indirect lighting, that is light emitting materials. While such materials appear to be illuminated, such materials do not otherwise affect surrounding objects or surfaces.
Download: KatsBits – Light Emitting Materials (c. 1.2 MB | *.blend, *.png).
Basic Emission Material
The most basic type of material that gives the impression of self-illumination in Eevee’s Rendered viewport display mode, is through the use of the Emission properties associated with Principled BSDF. Once the basic material has been set up in Shading Workspace, with or within a Image Texture node linked sourcing an image, by itself the emission’s Color and Strength can be set to provide colour and intensity information for the material.
Important: as of Blender 4.(x)’s menu reorganisation/recategorisation, Emission is referred to as Color, and Emission Strength simply as Strength [i], as both reside inside the Emission category [ii] of the Principled BSDF node rather than as stand-alone options.
With Blender 4.(x) some menus have option items have been reorganised, for example Emission is it’s own category [ii] within which sits (Emission) Color and (Emission) Strength [i].

Design note: when the Emission property of Principled BSDF is used, objects may still appear to self-shade, that is, be affected by other light sources within a scene.
Base Color
To use Emission with the Base Color property; click the Base Color [1] picker to set a colour then similarly in Emission, click the Color selector [2] to set the colour or tone of the light. Below this set a Strength value – click-type or click-drag the input field, the higher the values the brighter or more intense the light appears to be. Once set, the resulting material will appear to glow or emit a uniformly coloured or tinted light.

The most basic light emitting material is to just use Base Color [1] in combination with Color and Strength – not that emission can over-power base colour.
Image Texture
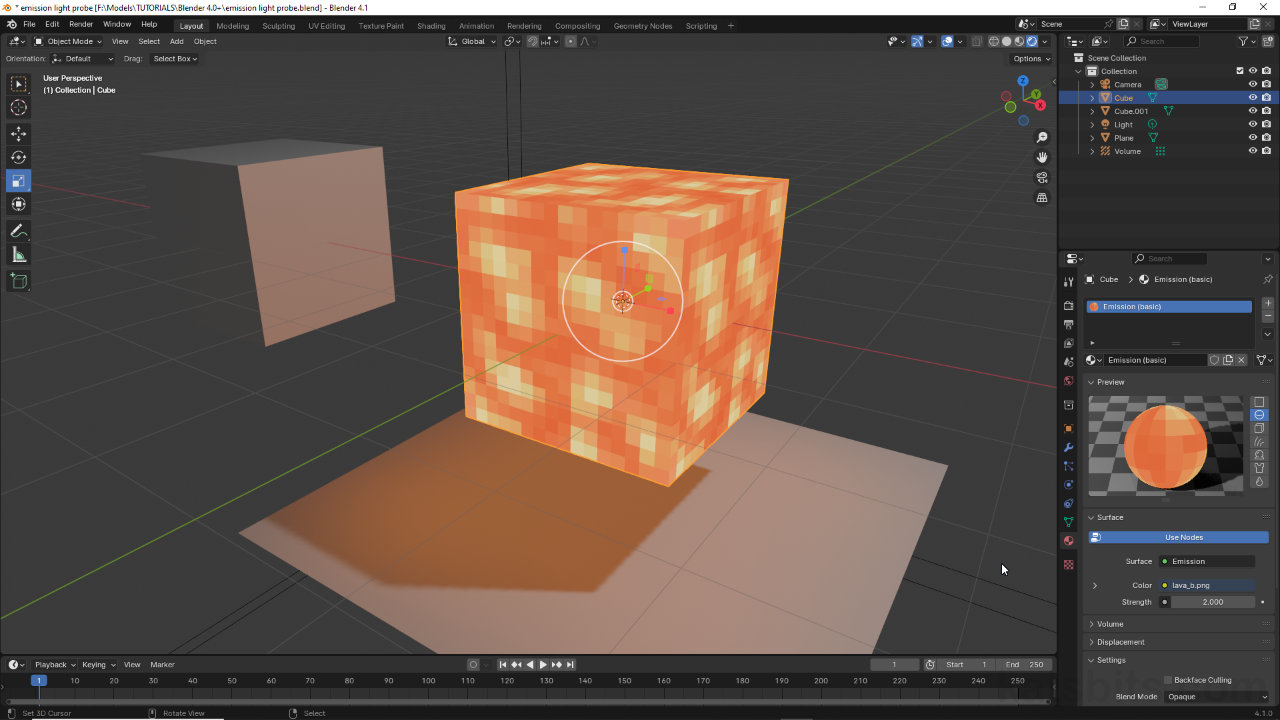
To use Emission with an Image Texture node; drop in an Image Texture node – Add » Texture » Image Texture. Link Color output to Base Color input [3] on Principled BSDF and load in an image representing the materials effect, lava for example. Next, using this same image node, link the same Color output to the Color input [4] under Emission of Principled BSDF. This determines the colour emitted by the effect. Finally, change the Strength value, similarly under Emission, to define the effects intensity. Once set up, the emission effect will appear to glow or illuminate based on the colour represented by the image associated with the material.
Design note: the image associated with the material does not need to be linked to Emission unless doing so is to specifically determine the (variable or precise) colours emitted, for example the reds, oranges and yellows of a lava texture, else it can remain disconnected and a uniform colour [iii] used instead per Base Color above.
The image associated with the Image Texture node does not need to be linked with other Emission properties [iii] as those can be defined independently setting Color and Strength.


Using an Image Texture node, the materials appearance and emission properties can be defined by the same image; simply link Color output to Base Color [3] and Emission Color [4] inputs.
Emission Node
An alternative approach to creating a self-illuminating or emitting materials is to use the Emission node. Here, the node can be used a number of ways for different affect depending on what’s required of the material.
Design note: unlike materials set up to use the Emission property of Principled BSDF, with inclusion of the Emission node materials effectively self-illuminate, that is meshes do not self-shade, objects essentially render uniformly lit regardless of scene lighting or illumination.
Emission Node Only
The most basic use of an Emission node it to drop one in place and link it directly to Material Output, completely bypassing Principled BSDF. To do this, from the Add menu drop in an Emission node – Add » Shader » Emission. Set the Color and change the Strength [5] as required, then link Emission output from the Emission node to Surface input [6] of the Material Output node.

Setting up an emissive material can be done using just the Emission node. Once dropped into place, Color and Strength set [5], it can be linked directly to Material Output [6] without needing to pass through Principled BSDF.
Emission + Image Texture Nodes
If the colour emitted by an Emission node needs to be particular, it can be defined by an image. This is done using an Image Texture node, with image loaded, that’s connected directly to the Emission node, again bypassing Principled BSDF. To do this, from the Add menu select Texture, then Image Texture – Add » Texture » Image Texture. This drops in and Image Texture node [7]. Click Open or + New to load in, or create, an image that will be used to define emission colour, then click-drag to link Color output (Image Texture) to Color input (Emission) [8]. Change Strength as necessary to define the intensity of the effect.
Design note: Strength can be defined by editing the value (input field) or linking an image to the input node; this can be the same image that determines Color – Color output linked to Strength input, or a separate Image Texture node [iv] holding its own image. Once linked [v] the effects intensity is then defined by the image – preference should be for greyscale images with Non-Color set as the Color Space.
Using an Image Texture [iv] to define the Emission nodes Strength [v] value – this can be set to use a Non-Color or other Color Space property depending on the image.


Adding an Image Texture node [7] to an Emission node [8] allows control of the emission colours, and optionally intensity, to be controlled by images.
Bloom & Screen Space Reflections
Emissive materials don’t affect neighbouring objects in Eevee, that is they don’t illuminate or otherwise act as a source of light. However, Blender has two Render settings that can be enabled to give a better impression of emissive sources, that they’re doing something within the scene besides self-illuminating. These are Bloom and Screen Space Reflections. Once activated emissive materials appear to glow and/or be reflected by surrounding objects and surfaces.
Design note: as with other indirect lighting and light effects in Eevee, Bloom and Screen Space Reflections do not ’emit’ light so are not actually illuminating neighbouring objects, they simply create the impression of illumination.
To enable, in Render Properties [9], click the checkbox to the left of the Bloom [10] and Screen Space Reflections [11] subheadings. Depending on the scene set up this will immediately take affect, emissive surfaces will appear to glow and be reflected in surrounding surfaces.
Design note: aside from adjusting the Color or other settings for Bloom and Screen Space Reflections, for both effects to be noticeable the emissive materials Strength specifically, and other material properties indirectly, i.e. Specular, Roughness etc., may need to be altered, taking care to avoid making the effect appear ‘full bright’. Similarly, scene lighting may need to be changed to accommodate the effect.

In Render Properties [9] it’s possible to ‘fake’ illumination by enabling Bloom [10] and Screen Space Reflections [11], creating the impression that emissive materials are illuminating or effecting the scene or other objects around them.
Emission + Transparency
If an emissive material is to include transparency, Principled BSDF may need to be used. Here, transparency can be provided by a separate Image Texture node carrying an ‘opacity map‘, or a texture that includes an Alpha Channel, that is then linked to Alpha input.
Design note: there are a number of ways to define transparency that may also affect the way Emission might work as an effect.
To do this, with a Principled BSDF node available, drop in one or more Image Texture nodes to accommodate the images to be used. Once set up link each Color output to their respective effect property input on Principled BSDF, for example, Image Texture #1 linking to Base Color and Emission; Image Texture #2 linking to Alpha [12]. Then in Material Properties make sure Blend Mode [13] is set appropriately, i.e. Alpha Clip (along with Clip Threshold), and that optionally, Backface Culling is enabled where necessary. This should result in a partially visible material with ‘glowing’ elements based on the transparency provided.
Design note: when using a separate image to define transparency, set Color Space to Non-Color to avoid tonal or colour aberration issues.

Using Principled BSDF with a set of Image Texture nodes appropriately linked [12], and Blend Mode set [13], emissive materials can include transparency that’s defined by the materials transparency.
Light Probe
In Eevee the only way for emissive materials to appear as though they’re affecting the environment is to use a Light Probe. In essence Light Probes bake localised light maps of a area that’s encapsulated within the probes flexible bounding box. When Rendered display mode is active this map then displays on surrounding objects and surfaces giving the impression of scene illumination by indirect light sources.
Design note: Light Probes are not dynamic objects like Lights (Point, Sun, Area, Spot). In other words, each time a scene is changed probes may need to be re-rendered to ensure the illumination represented is up to date.
To use a Light Probe, set up an emissive material as described above, using either Principled BSDF Emission or the Emission node. Once done, from the Add menu, select Light Probe then Volume – Add » Light Probe » Volume [14]. This drops a lattice into the scene that should then be resized, rotated or positioned relative to the objects to be baked. For basic functionality this is all that’s required. To then bake the map, in Render Properties [15] expand the Indirect Lighting subsection to reveal the available options and click the Bake Indirect Lighting button [16]. The selected Light Probe will then be baked and shown relative to the scene and other sources of light.
Design note: for Blender 3.6 or lower the Volume menu option is referred to as Irradiance Volume, i.e. Add » Light Probe » Irradiance Volume.

To simulate emissive lighting in Eevee light probes need to be used. Once added to a scene [14], in Render Properties [15] these can then be baked [16] as localised light maps that appear to illuminate surrounding objects.

A light Probe is used in conjunction with a Point Light – while the Point can be moved and adjusted on-the-fly, the illumination provided by the probe needs to be re-baked if something is adjusted that affects lighting in the captured area.
