UVW Mapping & Advanced Skinning Options in Gmax
For most of the objects in a scene it’s not necessary to go any further with skinning (as shown on the previous page) other than to just add a texture to a mesh, in some instances however, it is.
A couple of mesh objects in the scene use another ‘map‘ channel in the materials global settings which, when combined with the previously used (diffuse) texture, create a ‘visual effect’; in this particular case, transparency. This technique is very useful because it allows the detail of a texture to be used without resorting to excessive mesh modeling (particularly useful on low poly game models) to recreate the details in ‘reality’.
Sub-Material Map Channels
Once you’ve set up the basic material (‘A‘) – shown below with 3 sub-materials each being applied to different parts of the model – you can then choose which sub-material (‘B‘) you want the effect to be applied to. Clicking on any of the sub-materials opens up more editable properties including the ‘map’ channels; the channel we need to use is marked ‘opacity‘ (‘C‘).
Setting up Opacity (Transparency) Mask
This is done basically by using a texture layer that’s a gray scale or colour image with or without an ‘alpha channel mask‘. If it’s a grayscale image then you don’t necessarily need the mask as gmax is set to use (or can be set to use) grayscale masks in the same way as any other program – white is seen as being 100% opaque (solid), black is 100% transparent (can be seen thru), with various shades of gray effecting opacity & transparency. of the layer depending on it’s tonal value.
I found getting this next step right is was bit hit ‘n’ miss when putting this scene together, but that’s not gmax’s fault. I opted for the colour image with a mask channel included with the texture.
Design note: gmax can import and use a number of texture formats that allow the inclusion of a mask channel (alpha channel) but by preference *.tga images are always a good bet as they’re ‘game ready’. They do need to be saved as ’32 bit’ RGB images though (incidentally this isn’t the same as a true 32 bit image which is CMYK but a 24 bit RGB image saved with an additional 8 bit grayscale channel [the mask itself], the two added together are commonly referred to as a 32 bit tga)
The red shaded colour below denotes the area on the texture earmarked as the mask; anything not covered by this colour will be visible, anything else covered by red gets blocked and isn’t visible. This gives us a nice ‘fence’ or grill like pattern as the red areas are removed leaving only the remaining prongs to be shown on the model.
Design note: you’ll need to experiment with you photo-editing package to see how it creates masks and channels and once you understand how it’s done you can then use it to create interesting shapes and form on textures. The leaves used on the tree model in this scene have an alpha channel so you can see through them.
Opacity Channel Material Settings
Once the texture has been set up it can then be applied to the empty opacity map channel in the material browser (‘1‘ – called ‘opacity’ for ease of use but it can be called anything as necessary). Selecting the material applied to the model we can expand the map channels and click on the ‘Opacity’ button to reveal the parameters for that map; all that needs to be done is to assign the texture to the slot (‘2‘). Once it’s loaded a few settings need to be changed (‘3‘ – see below) and, if all’s gone well, the material pre-viewer (the round material covered ball at the top of the browser) should change to show the now ‘missing’ sections of the texture.
Design note: gmax doesn’t respond to the changes straight away so you often end up wondering if the material has worked even though it shows it has in the material pre-view. If this happens it may just be a case of clicking the various options in section ‘C’ until the main viewports show the same effect as the pre-view. This isn’t necessarily a ‘bug’ with gmax but it is something to be aware of.
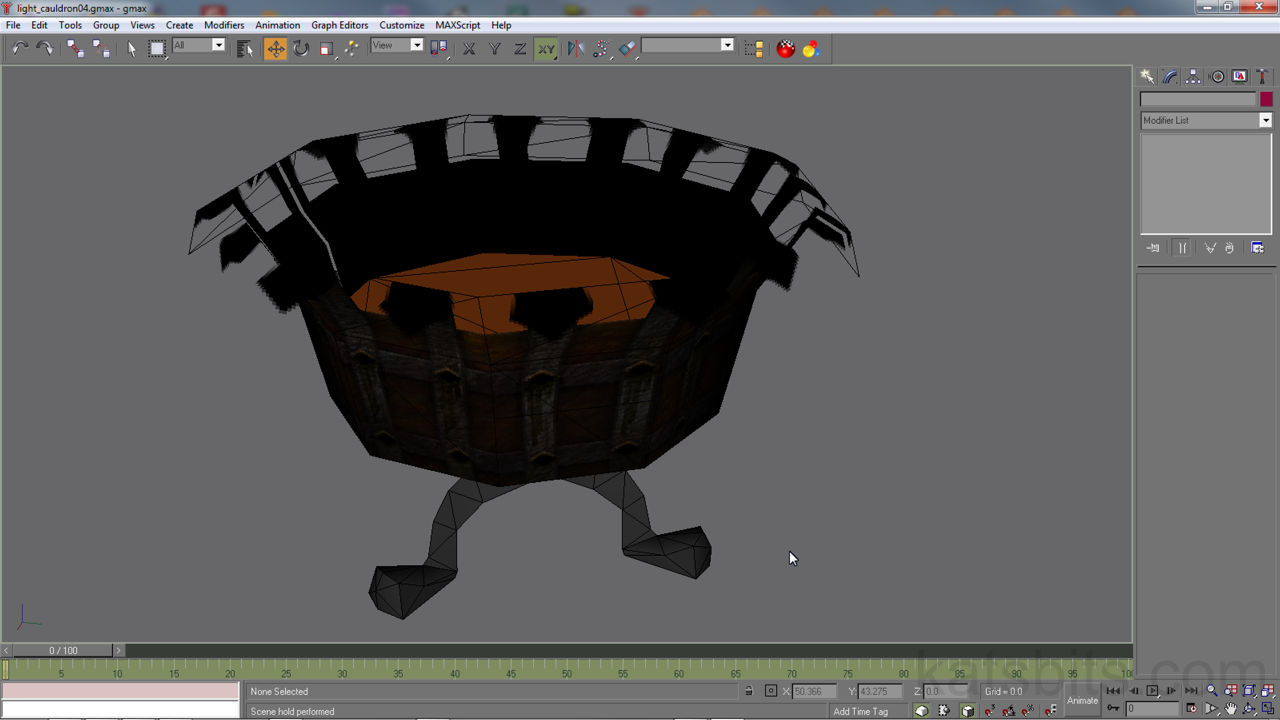
If everything has worked what you should see in both the material editor preview ball and in the main viewport window/s is the texture applied to the mesh with the missing alphachannel.
Design note: there does appear to be a ‘true’ bug with alpha channels with gmax. If you look at the image below you can see a thin line on the left and right hand side that cuts through and down the length of the texture, this line isn’t present on the texture and might be similar in nature to the issue that has plagued Adobe Photoshop users in the past and the infamous ‘1 pixel edge’ bug (a thin line always appearing around the edge of textures which made tiling difficult).
It’s not clear yet whether this is a viewport (and gmax) only issue; i.e. if you had access to 3D studio MAX and rendering capabilities it’s not clear if the ‘bug’ would show up in rendered scenes.
[1: Intro & How to | 2: Advanced Options]


