Grid Settings In Blender
One of the lesser discussed but more important aspects of using Blender to make content for games is its “Grid Settings” properties. The adjustable nature of this subsystem gives the application the ability to match other environments, be they other 3D applications or as is more common, other game development suites, without necessarily requiring the User perform what can sometimes be complicated re-scaling gymnastics to match a target environment when exporting material for use.
Resources
The following discusses the basics options available within “Grid Settings”, what they do and how they can be used, and any caveats that might need to be considered.
A basic understanding of Blender is necessary but not specifically required to get the most from the below information.
What is the Grid
The “Grid” itself, as seen in the 3D View, is essentially a visual aid, it represent the systems unit of measurement and can be changed in part of whole relative to that. It also informs the User about the Scenes contents; the size and scale of objects, and their relative orientation – as the grid is fixed, the horizontal always represents ‘front/back’, ‘left/right’ (relative to Blenders defaults), simultaneously acting as a ground plain or positional baseline from which to work.

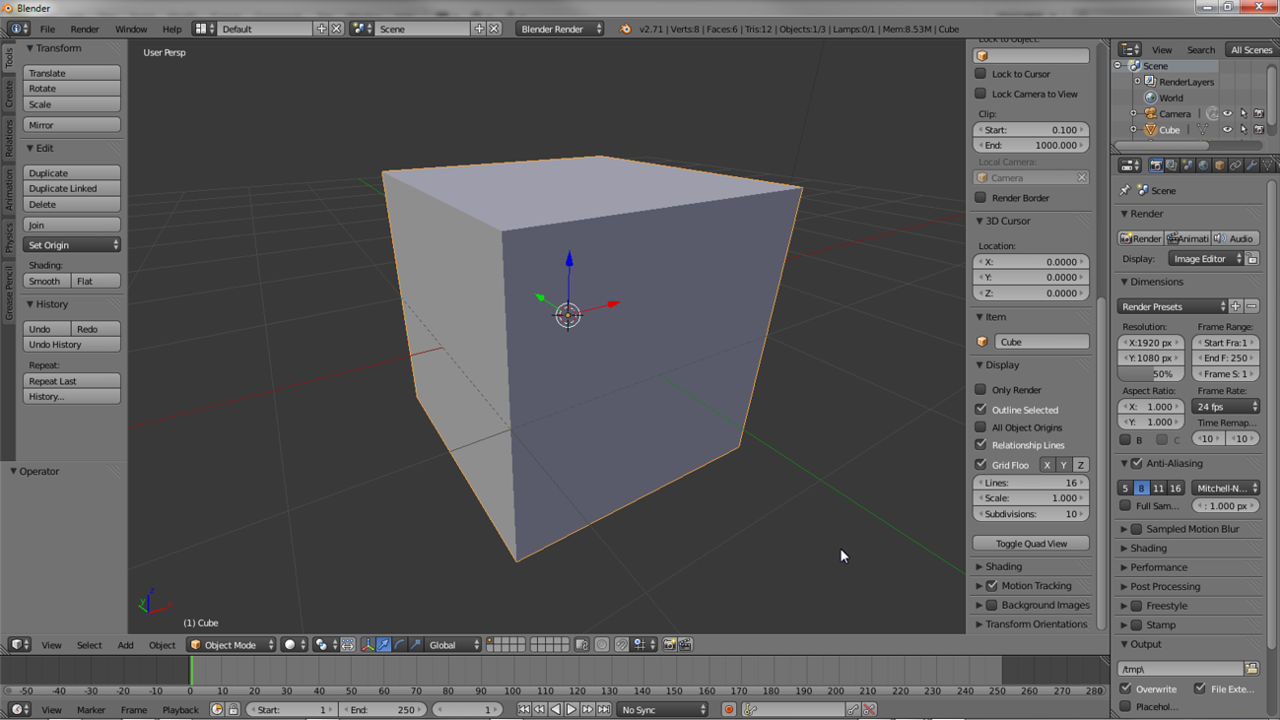
The Grid in its default state shown in ‘Orthogonal’ mode in the 3D View as displayed in newer versions of Blender post Blender 2.50 (2.71 shown above)

The Grid in its default state shown in ‘Perspective’ mode in the 3D View as displayed in Blender post Blender 2.50 (2.71 shown above)

The Grid in its default ‘Orthogonal’ (from the Right side without perspective) state as seen in Blender 2.49

The Grid in its default state in Perspective (Right side) mode in Blender 2.49 – note that it’s actually a lot larger than the same in newer versions of Blender (but performs the same way)
What are Grid Settings
The Grids settings are a collection of modifiable properties and values that determine a number of fundamental aspects of the Grid itself; the type of unit is being used, and the subdivision with respect to that. For example when Blenders “Unit” property is set to “Metric” using the default “Scale:” value, it represents one metre. This means when looking at the grid (at default zoom level) each major grid represents “1” unit, a single metre, with each subdivision equating to a sub-unit of ten centimetres (again using the default settings). In this way it’s possible to adjust the grid so it represents any number of measurement variables based on Unit properties – inches, feet, miles, kilometres etc. being typical, or more unusually pico-metres and much smaller units of micro-measurement.
Design note: for more details on setting up Blenders “Unit” system click here.

Major and Minor grid subdivisions in newer versions of Blender (includes all versions from 2.50) – default settings had one major grid subdivided by ten minor divisions, if the major represent one metre, each subdivision equates to ten centimetres

Major and Minor grid display in Blender 2.49 (and below) – similarly to the above each sub-unit represents one tenth of the larger cell, or ten centimetres if the major unit is taken to represent one metre
Why change Grid Settings
Generally speaking, the most useful aspect of Grids Settings is its flexibility, in being able to change its properties, Blender can be set up to replicate most other environments, be those game engine or development related or just other 3D applications. This ensures content produced in Blender properly matches those of a target, unit for unit.
Design note: creating content for a BSP ‘idtech’ or ‘Unreal’ style game engine for example, would mean setting Blenders grid up so minor subdivision match those of the respective editors, thus ensuring meshes are correctly sized when imported. How this is done often requires the importation of reference material from the target into Blender so the grid can be properly determined and set up as it’s not always obvious what measurement system should be used.

Radiant’s grid is subdivided using a ‘power-of-two’ rule – by default, on “Grid 4”, the editor displays a major grid divide every sixty-four (64) units which is further subdivided into eight, eight unit blocks (8 x 8 units = 64). Being able to change Blenders Grid Settings means matching this

Similarly, Blenders Grid Settings can be changed to match those of other 3D applications like 3ds Max (version 9 shown above) which defaults to a major grid subdivided by 10 units – note however that this represents a grid subdivision only and does not necessary reflect the scale or unit of measurement (which defaults to inches and should mean each grid major representing one foot divided by twelve inch units but isn’t and requires manual adjustment [this may not be applicable in new versions of the application])
How to change Grid Settings
Grid Settings are generally in the same tool group across all versions of Blender but that group may appear in slightly different locations; in Blender 2.49 for example Grid Settings are part of the “View Properties” overlay panel, whereas in Blender 2.50 and above (up to and including the latest versions) the settings, whilst still associated with the broader ‘view’ properties, is now located within a dedicated tool shelf/tool bar, “Transform” or “View” properties. To access Grid display settings, press “N” to open the “Properties” tool shelf in Blender 2.50 and above, and scroll down to the “Display” subsection (click the triangle to expand the options if not visible). Alternatively for all versions of Blender click the “View” menu option from the 3D View Header and select “Properties” for Blender 2.50 and above, or “View Properties” for Blender 2.49 or below (shown below).

In newer versions of Blender (Blender 2.71 shown but applies to any version 2.50 and above) Grid Settings are still associated with the view and its respective properties but located in the Transform tool shelf under the “Display” subsection (which now also contains much of the previous “View Properties” settings)

In Blender 2.49 “Grid” settings are part of the “View Properties” overlay and defined by “Spacing:“, “Lines:” and “Divisions:” values
Grid Lines
To adjust the grids size, that is its width and depth relative to the 3D View, change “Lines:” to alter the number of ‘major’ divisions there are – increasing or decreasing the number changes the grids physical size in relation to the 3D View making it larger or smaller depending on the value set. To change, LMB click and type a number, press Enter to confirm.
Design note: Blender 2.49 defaults to the grid being “60” lines across, whereas later versions post 2.50 default to “16“. It’s important to note that lines only change the grid when viewed in “Perspective” mode, they have no affect on Orthogonal display, which display an ‘infinite’ grid at all times.

In Blender 2.50 and above the default number of “Lines:” displayed is “16“, i.e. a 16×16 grid effectively making it a 160×160 unit grid

The default grid can be adjusted by an arbitrary value, useful when editing or making large objects

For Blender 2.49 and below, “Lines:” defaults to “60“, i.e. a horizontal 6×6 grid of blocks of 10, effectively making it a grid that’s 600×600 units wide and deep on the horizontal

Reducing the “Lines:” value decreases the size of the grid relative to the 3D View, a grid of 40×40 lines equates to it now being 400×400 units across
Grid Spacing/Scale
In addition to “Lines:” the grids physical size can be changed altering its “Spacing:” or “Scale:“. What this does is change the ‘scale’ each division/subdivision represents relative to the base unit; for Blender 2.49 this is a fixed value, “1” which simply represent a ‘whole’ number; for Blender 2.50 and above, it can be changed in “Unit” properties – simply type a new value relative to the scale needing to be increased or decreased. To change the value LMB click and type a value pressing, press Enter to confirm.
Design note: if the base unit is “1”, a grid with a Spacing/Scale value of “0.5” represent half the ‘scale’ of that base unit, so although Objects remain the same size the Grid appears around them using smaller units (cells). in Blender 2.49 through to Blender 2.55 this aspect of grid properties is called “Spacing“. From Blender 2.60 onwards it’s referred to as “Scale” to properly reflects its purpose and its actual function when used – it doesn’t ‘space’ the grid (expand or shrink it arbitrarily), it ‘scales’ it relative to the base value set in “Unit” properties. For Blender 2.49 and below, “Spacing:” is also used to define Grid unit size because it doesn’t have a system to do that – the default major ‘unit’ is always “1”, which can represent a foot, inch, centimetre etc., in which case adjusting the Spacing value makes it possible to set the grid so that minor subdivision represent an increment – inches relative to feet, centimetres relative to metres etc.

Using the default Scene cube as a reference, the default grid settings mean it sits snugly within the subdivisions making both the grid and object uniform relative to the set “Scale” (“1” in this instance)

Changing the scale subsequently means the grid clips through the default Scene cube so measurements and distances have to be adjusted or compensated as required. Being able to set “Scale:” does have the advantage of being able to divide the grid relative to a specific distance although not specifically necessary in Blender 2.50 and above which has a dedicated “Unit” system for this (assuming a decimal fraction when used in this context – see below)

Similarly in Blender 2.49 or below “Spacing:” performs the same function of altering the size of grid divisions. Using the default value of “1” the default Scene cube sits within the divisions…

… change “Spacing:” however, and the grid changes relative to objects and distances – for Blender 2.49 this is important for calculating and working with different measured distances, so long as they are decimal fractions of “1” – an inch being “0.0254” etc.
Grid Divisions/Subdivisions
When using Grid properties to define the distance each ‘cell’ represents, it can be augmented using the “Divisions:” (Blender 2.49 and below) or “Subdivisions:” (Blender 2.50 and above) option to divide major grid elements into specific numbers of sub-units (essentially the number of cells in a row). In wanting to work in Imperial measurement for example, each major grid unit might equate to one foot so setting “Subdivisions” to “12” would mean each cell representing a single inch, and similarly with centimetres to metres, metres to kilometres etc. To change the value, LMB click and type a number (in whole units) and press return to confirm.
Design note: in Blender 2.49 the feature is called “Divisions“. In Blender 2.50 and above its referred to as “Subdivisions“, again to better reflect what the feature does and how it actually works with respect to the Grid. Note that for Blender 2.50 and above, “Subdivisions” may be disabled when using “Metric” or “Imperial” Units because the options attributed to that function are set via “Unit” properties – which typically determine grid subdivisions. Currently in Blender 2.49 and Blender 2.50 and above, Divisions/Subdivisions do not appear in Perspective mode in the 3D View, the grid displays major units only (cells are not further subdivided).
")
In Blender 2.50 and above by default the the Grid has a “Subdivisions:” level of “10” meaning each major grid cell is a 10×10 grid of smaller segments (each major cell contains 100 smaller units). Note this feature only appears in the 3D View when using the Orthogonal views, it does not appear in Perspective mode (only the major grid appears), however objects will snap to the smaller units once set

Setting “Subdivisions:” lower, to “5” in the above, increases the relative size of each minor cell whilst decreasing their number, creating a 5×5 grid inside each major cell (totaling 25 sub-cells) instead of the default 10×10 Grid
")
In Blender 2.49 or below, changing “Divisions:” alters the number of ‘cells’ each major grid unit contains, the default being “10”, based on the decimal system the application uses for measurement. This means each major grid unit contains 10 rows and 10 columns of sub-units (100 in total)

Lowering “Divisions:” to “5” means that each major grid now contains fewer cells per row and column, making a 5×5 grid, or 25 sub-cells for each major unit
Conclusion
As discussed Blenders 3D View Grid is useful ostensibly for scaling and sizing models and objects relative to either real world considerations – architects for example, or when needing to match the system of another application. For Blender 2.49 and below the Grid is especially useful because the application doesn’t have a fully formed measurement or ‘unit’ system, as is the case with versions 2.50 and above, so with a little thought (and some calculations) can be used to good effect in the absence of that. It should be noted however that using the Grid to do this may not necessarily be compatible or correctly match across applications because they all tend to have their own idiosyncrasies, so a certain degree of testing will be required – exporting reference blocks from one, importing them into another, to ensure proper fit for example.
Video
The following video shows the above in context and how each changes and affects the Grid as it appears in the 3D View.
For Blender 2.56 and above, although Grid settings are in the same location as for previous versions, “Spacing:” has been renamed “Scale:” to properly reflect what the option actually does when used. Note that when using “Subdivisions” the result is not clearly indicated in Perspective mode as it only changes the way major grid cells appear relative to their default size/scaling
In Blender 2.49 and below “Grid” properties is an overlay accessed from “View Properties“. Using the available settings it’s possible to create different levels of measurement based on grid/cell numbers and their respective distances to each other

