Import Google Building Maker Models into Blender
Google Building Maker, now SketchUp 3D Warehouse, is an interesting source of low-polygon buildings based on real-life location data and imagery. Although models are not typically used outside Google Earth or SketchUp, following a few simple steps it is possible to extract files and import mesh data into Blender or other 3D application for further work.
Important: as of June 2013 the Google Building Maker service was discontinued although models previously made and published continue to be made available through 3D Warehouse as a model depository, and SketchUp as the production tool.
The following tutorial discusses the basics of the ‘conversion’ process from Building Maker (3D Warehouse) to Blender. Familiarity with Blender, in particular importing assets, is a prerequisite.
Download: Building Maker Example (c. 250 KB | *.blend, *.dae, *.kmz, *.jpg).
Resources
– Building in Birmingham
– Exporting models to O3D
– Importing SketchUp models
– Importing gmax into Max
Save/Export Building Maker models
Models made available through 3D Warehouse may be downloaded and saved variously as a “Google Earth KMZ” (*.kmz), “SketchUp [n] Model” (*.skp – where [n] equals a version number) or “KMZ from SketchUp” (*.kmz) file depending on the 3D application or service used to make the model originally.
Design note: downloads are only available as outlined above, it is no longer possible to download *.dae files directly. Note also that as 3D Warehouse files tend to be publicly available, signing in to Google prior to download is not a necessity unless accessing hidden or unpublished files an Author may have in their Warehouse Account.
To download a model simply navigate to the product page of the item wanted and click the “Download” button then choose a “KMZ” option as presented – either “Google Earth KMZ” or “KMZ from SketchUp“. Save the file to a project folder or the Desktop.
Design note: the follow steps only work with KMZ files. To use SketchUp “SKP” files they will first need to be opened in SketchUp and then re-saved or exported as a “Google Earth” models before then being extracted per the below.

Google 3D Warehouse page showing an individual model built using Google Building Maker

Download the selected file from 3D Warehouse
Opening the KMZ file
The KMZ file saved is actually a container similar to a compressed ‘zip’ archive so their contents will need to be extracted before use. To do this make a copy of the downloaded file and then change its extension to “.zip“, i.e. rename “Building-in-Birmingham.kmz” to “Building-in-Birmingham.zip“. Once done extract the files contents as would normal be done for any ZIP archive using Windows archive management, WinZip, WinRAR or other archive program. The result should be (in this instance) an additional three files; “doc.kml“, “image[n].jpg” (where “[n]” is an incremental number) and “mesh.dae“.

The KMZ format is a container so to access its contents make a duplicate of the file downloaded and change the extension to “zip“, i.e. “[filename].kmz” to “[filename].zip”

With the duplicate file type changed extract the contents of the ZIP archive using Windows native archive management, WinZip, WinRAR or other archive management software. This should result in an additional three files (number of assets will vary depending on the models complexity and size)
Import Google Building Maker models into Blender
With the files extracted, to import the building, from the “File” menu in Blender select “Import » Collada (Default) (.dae)“. The “File Browser” will appear. Browse to the previously extracted files and (LMB) select “mesh.dae“. Whilst still in the File Browser ensure “Import Units” is selected in the “Import COLLADA” properties section bottom-left (click the checkbox) and then finally click the “Import COLLADA” button top-right. Blender will pause momentarily whilst the file is parsed, returning to the 3D View once done with the imported mesh visible, but likely untextured – if this is the case use the “UV/Image Editor” to re-assign the buildings texture/s to the model as needed.
Design note: images are generally pulled in as part of the import process and either automatically assigned to the mesh or made available for manual assignment as needed. Ensure “Texture” Viewport Shading mode is active, “Alt+Z“.

Importing “mesh.dae” selecting “File » Import » Collada (Default) (dae)”

In the File Browser, select “mesh.dae” and activate “Import Units” to ensure the model is properly scaled relative to Blender, else the model will import using an extremely small scale value (resulting in it likely being smaller than the default Scene cube)

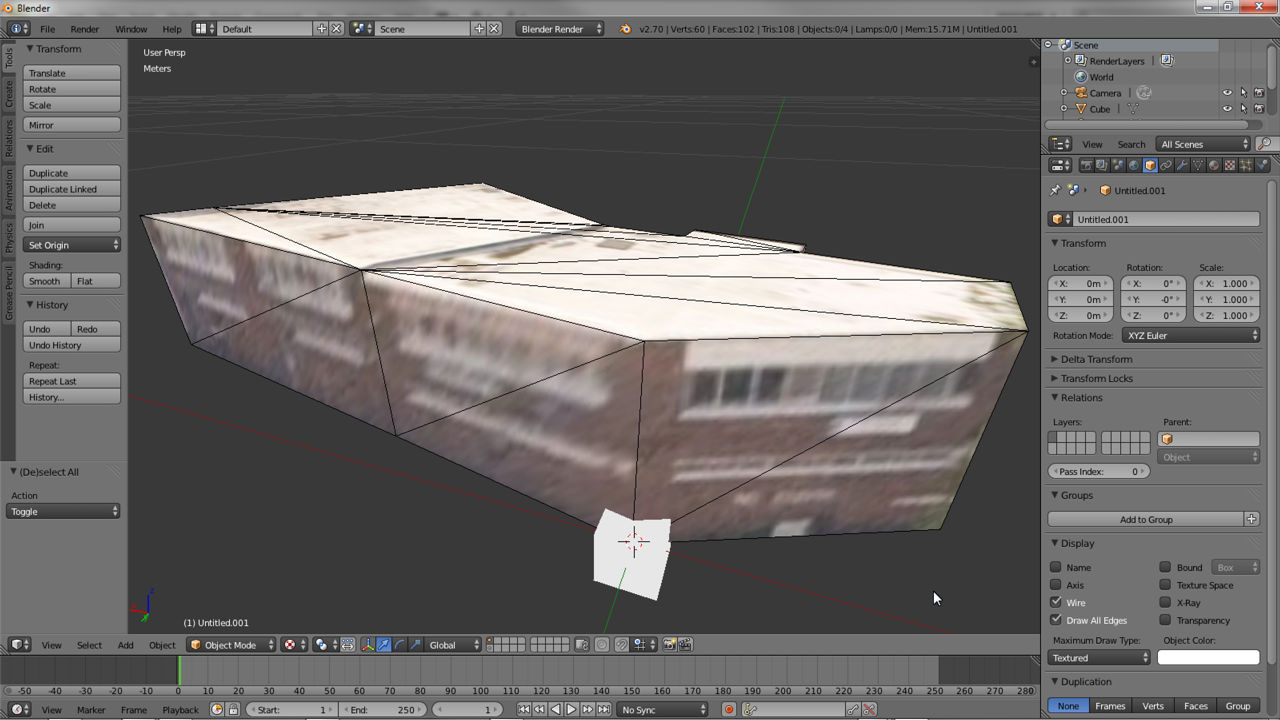
The resulting building imported into Blender ready for further editing (meshes always import triangulated so will need to be converted to ‘quads’ for ease of editing before continuing). Default Scene cube shown for scale – Units of measurement change to “Metric” when “Import Units” is select as above
Import Building Maker models into Blender 2.49
To import a building model into Blender 2.49 or below, from the “File” menu select “Import » COLLADA 1.4 (.dae)” – be sure to select the “… 1.4” importer and not “…1.3.1“. The “File Browser” window will appear. Locate and then select “mesh.dae” and click the “Import .dae” button top-right. Blender will return back to the Collada import screen with the selected file displayed in the “Import File:” text field. Finally click “Import and Close” to actually import the file and return back to the 3D View, the mesh being displayed with textures automatically assigned.
Design note: although textures should assign automatically, re-assignment to the objects UV map may be required. If the mesh appears untextured check the 3D View display mode, it should be in “Textured” mode (“Alt+Z“).

In Blender 2.49, from the “File” menu select “Import » COLLADA 1.4(.dae)” to start the import process for the building model (make sure to select the “..1.4” import option, using “…1.3.1” either won’t work or will cause problems/compatibility issues)

After the file, “mesh.dae“, has been selected using the “File Browser“, the Collada plugin dialogue is used to complete the import process – click “Import and Close” to finish

Blender will return to the 3D View with the mesh textured and ready for editing. Note the mesh will be triangulated and will typically need to be reverted to quads before continuing
Convert triangles to Quads
Although using Building Maker/3D Warehouse models is a quick way to generate content, because they are reductively enhanced for online delivery they are aggressively optimised and triangulated so will typically need to be converted into ‘surfaces’ – quads or Ngons – before any further editing can be carried out without too many issues. To do this “Shift+RMB” select triangle pairings (individual triangles next to each other), or select the entire mesh, and press “Alt+J” to convert tris to quads – note that due to the heavy optimisation, joining triangles together may result in incomplete or poor positioning of surfaces that are often counter to the meshes overall edge loop structure, or that might otherwise break surface continuity, possibly then requiring more work than initially considered.
Design note: use “Alt+J” as a shortcut or from the 3D View menu header select “Mesh » Face » Tris to Quads” (in Blender 2.49 or below similarly select “Mesh » Faces » Convert Triangles to Quads“).

The optimised and individual triangles of Building Maker (3D Warehouse) models need to be converted back into “Quads” or “Ngon” surfaces for ease of editing – after selection press “Alt+J”

Model after being converted to Quads – note that some surfaces are left in their default triangular state because there are no corresponding and available surfaces to generate a valid quad or Ngon

In Blender 2.49 converting triangles to Quads (Ngons not fully supported) using “Alt+J” once selected

Model after conversion – note similar issues to the above, some triangles cannot be made quads as there are not enough surfaces available to make contiguous surfaces (quads/ngons)
Conclusion
There are a number of caveats to using 3D Warehouse/Building Maker models due to their heavy optimisation, and the way the textures are assigned to UV maps – often meshes can be aggressively structured such that modification can be problematic, resulting in the object then having to be rebuilt from scratch (from the ground up); ironically it is in fact often better to do this, rebuild, using the downloaded model as a guide or template rather than expend undue amounts of time trying to ‘correct’ problems that might be present.
Design note: textures often contain image segments taken from multiple sources each typically photographed from a different camera angle or location. This can result in bitmaps assignments that sometimes exhibit peculiar orientations or perspectives that may make them difficult to use. This also means they are not always laid out efficiently across the available UV/Texture space, additional reasons why it may be better to rebuild rather than ‘correct’.
Commercial Usage Rights
In addition to any technical issues, before downloading and using models be sure to check the proper ‘Rights’ to use materials provided by third-parties – although an individual might have made a given model, doing so does not necessarily mean assets made available through 3D Warehouse and Google to facilitate the production process are useable without restrictions.

