UVW Mapping (Unwrapping) & ‘Skinning’ Models in Gmax
2D artwork was used on the meshes which meant using UVW map and and UVW unwrap. As this is a big part of the workload for the scene it’s probably a good idea to run through the process so those not familiar with it can at least see how it’s done.
There are a couple of ways to ‘skin’ meshes depending on what you’re going to do with it, but the one I chose was the same used when making modeled objects ‘game ready’, i.e. to put into a game like Quake3.
The following is a quick ‘walk thru’ on skinning an object, in this case the cauldron placed by the door and acting as the main light source for the scene.
The Basic Mesh
As you can see below the mesh isn’t too complex, an object like this doesn’t really need to be, the legs for example are shaped triangular ‘tubes’, only the feet having any fancy work done to them as that’s what players in game would normally be able to see. Doing this keeps the poly count reasonable low and yet still give the model a bit of interesting geometrical detail. cauldron

The modeled object we’re going to texture.
Adding a ‘Material’
In this particular instance because the model was already split up into sections (the ‘legs’, ‘body’ and ‘fire’) a ‘multi-material‘ was used and applied so each section had it’s own ‘sub-material‘.
The material editor was opened (keyboard ‘M‘) and a new entry created using the ‘multi-material‘ option from the popup dialogue (a choice os ‘standard‘ or ‘multi-material‘ is given). Only 3 ‘sub-materials‘ were needed in this case and they were given names appropriate to where they were going to be assigned (‘body’, ‘leggies’ & ‘topbit’) because I’m forgetful..!, if more were needed they can easily be added by clicking on the ‘Add‘ button, similarly if fewer were needed the ‘Delete‘ button removes the unwanted extra slots.

Materials
To save a bit of confusion later on when navigating through the editor the top level of the material was given a name ‘cauldron’ making it easier to figure out where you are in the hierarchy (it’d be like naming folders in Windows with the same name and then finding something in one of the sub folders).
Sub-Material Properties
Each ‘sub-material’ was given it’s own properties as shown below. The window indicated by "1" shows the results of changes made to the materials properties, in this case just a base colour, which is assigned in section "3". Clicking on the coloured box to the right of the ‘Diffuse‘ parameter opens up a colour mixer dialogue box where you can make and assign your own custom colour to that sub-material, it’s where that rustic-red colour was made for this particular sub-material; clicking the small button far right brings up a texture browser where you can apply a bitmap to the material.
The body of the cauldron also needs to be ‘2-sided‘ so it’s solid regardless of which side you look at the mesh, something that isn’t done by default on a mesh when you 1st create it (see the 1st shot above). Placing a ‘tick’ in that check box ("2") turns on the 2-sided property for the material.

Material assignment
At the end of all this the model has a single ‘multi-material‘ which contains 3 ‘sub-materials‘. We can now open the ‘material navigator‘ and apply the sub-materials to the mesh sections.
Applying Materials
Opening the ‘material navigator‘ means we can apply each sub-material by LMB hold, select, drag and dropping the sub-material over a mesh section; as the mesh has yet to be UVW mapped either the base colour of the material shows or textures appear skewed and miss-aligned, this can be fixed by UVW mapping the objects.

Material types
‘Skinning’ the Mesh
We now need to ‘skin’ the object and set the texture straight so it fits the mesh better by using the UVW Mapping modifier (modifier List > UV coordinate modifiers > UVW Mapping). In this particular case the UVW map was a ‘cylinder’ (uncapped) applied to the body of the model. The texture won’t always be a perfect fit the first time this is done, it’s often garbled or doesn’t show so it often has to be edited to fit the mesh better. This is done using the UVW map editor.

Skinning the mesh
UVW Editor
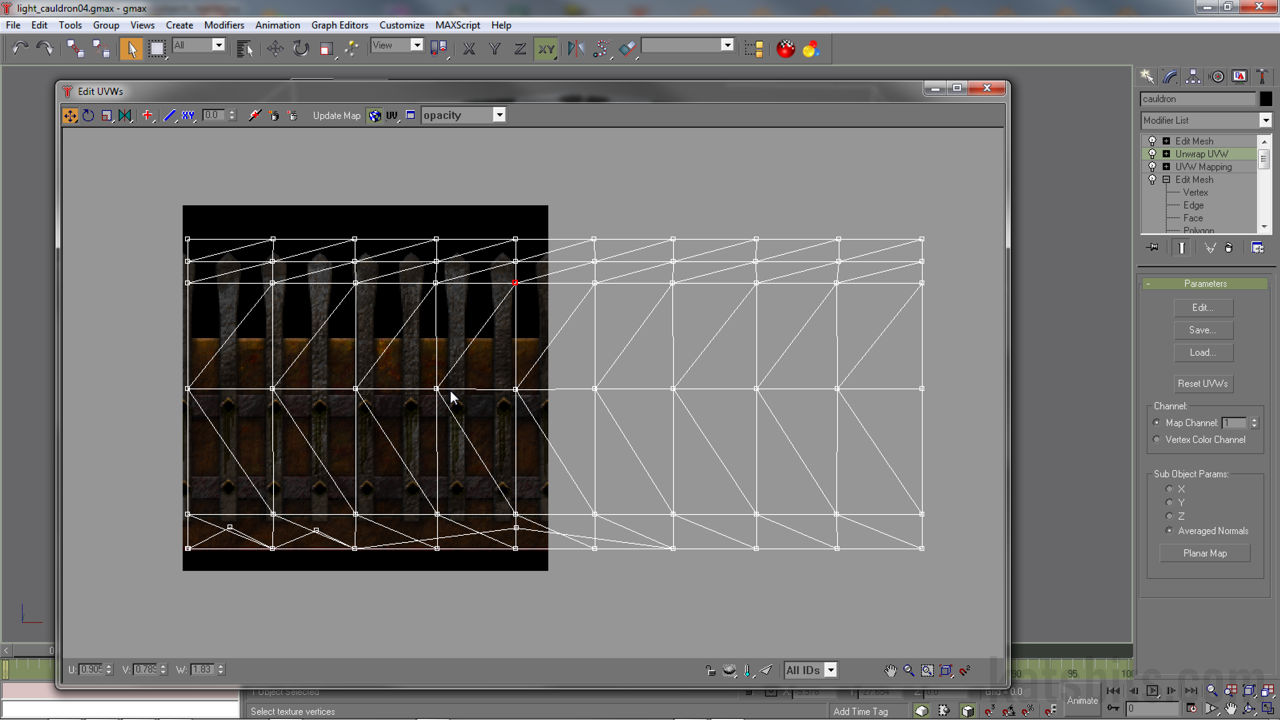
Once a UVW Map has been added it then usually needs to be checked and edited with the Unwrap UVW modifier (modifier list > UV coordinate modifiers > unwrap UVW [shown left]). Adding one of these changes the modifier panel and displays a couple of new buttons, one of which is called ‘edit’ clicking this opens up the ‘Edit UVW’ window as shown below.

UVW mapping the mesh
Depending on how complex the model is you’ll usually get all the vertexes that constitute the individual polygon faces showing up in the editor window which can look quite a mess. If this happens you need to do a bit of optimising UVW mapping sections of the model. In the case of the cauldron just the cylinder UVW map shows in the editor (as that’s all that has been mapped at the moment). All that’s needing to be done now is selecting the appropriate vertexes and moving the mesh around until you match the texture alignment you want in the 3d viewport (the texture will change after each move of the UVW vertexes). Once this is done you end up with something at this stage to the image below.

Final UVW mapped object
[1: Intro & How to | 2: Advanced Options]

