Custom Poses For Furniture (IMVU)
In principle making custom avatar poses for IMVU furniture items is relatively straightforward; first create a furniture item and places a pose spot as normal, then pose the avatar and export both out to FBX, which are then brought together in Create Mode. The following then discusses this process, of adding custom poses to IMVU furniture using Blender.
Download: KatsBits – Furniture + Custom Pose Example (c. 2.6 MB | *.blend, *.fbx, *.jpg, *.png).
For best results a basic understanding of Blender, and IMVU’s Create Mode process, is recommended.
The following material does not discuss making the game model/mesh seen in IMVU, i.e. ‘chair’, ‘lamp’, ‘bed’ or other visual element Users actually see in game/client. To learn how to mesh and make model in Blender click here.
Introduction
When making furniture for IMVU allowance has to be made for the addition of pose spots, typically the sitting or standing positions the avatar is seen in when interacting with the item. Their set-up is relatively simple; make the mesh and then add a set of nodes to act as an underlying structure IMVU can utilise to determine how the item is to be used (interacted with by the User in chat). If this includes avatar interaction a set of ‘seat’ or ‘pose’ nodes will be included as part of that, for example either "seat[n].Sitting" or "seat[n].Standing" and so on.
Design note: .Sitting and .Standing are the defaults but others can be used as explained below.
For custom poses these same nodes are required but the way they are referenced changes slightly, the ‘seat’ node is appended a different reference that’s matched to a specific avatar pose instead of the normal *.Sitting or *.Standing appends and actions/poses.
Design note: custom seat nodes can be given any name but they are cAse SensiTive.

A simple high-back chair with a default ‘sitting’ and custom ‘standing’ pose made entirely in Blender, exported to FBX which is then imported in Create Mode for assembly
Furniture Set-Up
In Blender, aside from setting up the furniture item as normal, that is parenting the mesh to the "Root" node along with any other nodes (subject to animation requirements), position the *.Sitting and *.Standing node relative to where the avatar should appear, and depending on the number of spots, name them appropriately following the numerical convention, i.e., "seat01.Sitting", "seat02.Standing" and so on where more than one set of nodes is used. This initial set-up acts as a positional guide that will be used to pose the character relative to the furniture item.
Design note: when positioning the nodes the Origin point of "seat[n].Sitting" and "seat[n].Standing" is where the avatar typically appears using the default poses, essentially directly under the main trunk of the torso. However this may need to be later adjusted to better accommodate the pose and the avatars position relative to the mesh.

Position the avatars approximately where they need to be, this form the basis, or guide, around which the custom pose is to be made (note the position of the standing spots "Catcher" and "Pitcher" nodes, they are offset to allow the avatars to interact with each other without intersecting the furniture item – so long as the distance between the two is untouched, the pair can be positioned anywhere)
Append The Furniture
Once the furniture item is set-up approximately, save it then open the female or male avatar pose file. Before posing the character however, the furniture item and seat node need to be brought into the avatar file so they can be used as fixed references against which the pose is made. This is done using the "Append" feature.
Design note: the avatar files, "Female04 (pose)" and "Male03 (pose)" are essentially the same. There are some minor differences however but in general for poses, using either/or will produce the same pose in IMVU.

Male and female avatar files showing bones orientated to match what IMVU expects on export. Although both figures use the same underling skeleton there are subtle and slight differences that may need to be accommodated


To do this, from the "File" menu click "Append" ("File » Append"). In the "File Browser" view that appears, browse to the furniture *.blend file previously saved (e.g. "highback.blend") and left-click (once) to access its contents. A series of folders will be displayed. Left-click "Objects".
Design note: each folder contains a different type of ‘data’ Blender can append, typically only ‘objects’ need to be appended when setting up pose spot.
Here, using "Shift", right or left-click (both buttons perform the same function in this context) the listing corresponding to the furniture mesh and the seat node associated with the pose spot to be customised (e.g. "seat[n].Sitting"), then left-click the "Append from Library" button top-right. Blender will load the items into the Scene based on their original locations in the furniture file, this may necessitate some adjustment of the furniture mesh and reference node as a unit ("Shift+RMB" both) so the nodes Origin is approximately positioned to match the avatar Armature Origin.
Design note: the Origin point is the small sphere seen when an object is selected, it’s important before posing the avatar the furniture item and the seat node reference are correctly positioned relative to the avatar, done through comparing the Origin of the avatars Armature and the seat node reference, both should match. This is because the Origin of both are the ‘root’ positions, i.e. where is appears in IMVU when loaded into a scene – for the avatar to be correctly positioned relative to the mesh, the Origins must match.
The Origin displays as a small sphere when objects are selected


In the "File Browser" that appears after "File » Append", select the furniture file previously saved to access its contents then click "Objects" (folder). Here multi-select ("Shift+left-click") the furniture mesh and the seat node reference then click "Append from library" top-right

The selected items will be brought into the Scene located in the same place they were in the original file

Adjust the position of the appended mesh and seat reference so the reference nodes Origin is approximately located to match the avatar Armature Origin – important to ensure the pose appears correctly placed in IMVU
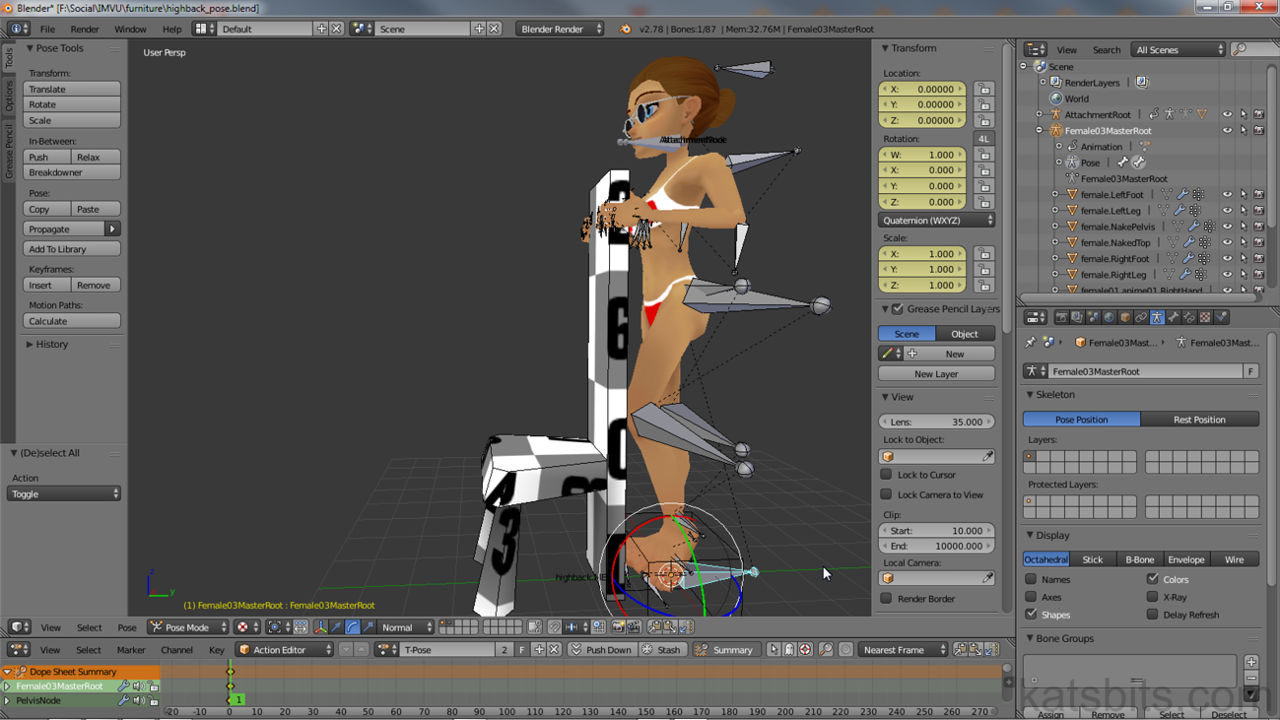
Posing The Avatar
Once the furniture mesh and reference node are positioned relative to the avatar, the latter can be posed to fit, in this instance standing behind a high-back chair with their hands grabbing the sides – the avatar is posed so the arms are bent at the elbow to position the hands, and fingers manipulated appearing to ‘grab’ the chair sides. The left leg is also kinked at the knee, which rests against the lower back of the chair mesh.
Design note: furniture typically uses static poses (the avatar doesn’t move), animation is supported. The initial set-up for this type of content is the same as for static (Origin location etc., as outlined above) but care should be taken to accommodate articulation, especially of the limbs, doesn’t accidentally intersect the mesh during playback.
Like all animated content in Blender, avatar poses are largely created in the "3DView" by manipulating the character in "Pose Mode", and the "Action Editor" to capture and manage that activity. For most poses all that’s necessary is the selection individual bones so they can be rotated into position around their "X", "Y" and "Z" axes using the "Rotate" widget (a "Transform Manipulator") with the "Transformation Orientation" set to either "Local" or "Normal".
Design note: to make bone manipulation easier, setting the "Transformation Orientation" to "Normal" or "Local" means bones are manipulated around their own axes rather than the Scenes. In other words bones rotate relative to the direction they are pointing.
So, if the avatar Armature is not in "Pose Mode" right-click the object and from the "Interaction Mode" selector in the 3DView Header, click "Pose Mode" from the options available (or press "Ctrl+Tab » Pose Mode") – if a bone is already selected it will outline a pale blue confirming the change. In the "Action Editor" left-click or left-click drag the timeline widget/slider to frame "1".
Design note: if the "Action Editor" is not visible, swap the default "Timeline" view or other area to the "Dope Sheet" then set the "Editing Context" to "Action Editor".
In the 3DView, subject to the pose right-click select a bone (highlights pale-blue) and using the "Rotate" widget, left-click drag each of the green, red, and blue axis circles, to manipulate it into position. Release to confirm. Repeat this for each bone associated with the pose then press "A" clear active selects, then again to "(De)select All" (or menu: "Select » (De)select All"). From the "Pose" menu in the 3DView Header select "Animation » Insert Keyframes" (or press "I" with the mouse over the 3DView) and from the "Insert Keyframe Menu" that appears choose "LocRot" (‘location’ and ‘rotation’). A set of markers will appear in the Action Editor timeline confirming pose capture. For all intents and purpose this is the pose. Check its position, and make any adjustments relative to the furniture mesh and seat node reference, save the file and export.
Design note: the Action Editor already contains an ‘Action’ and a set of keyed frames be default for convenience, this can either be deleted, over-ridden or a new Action created to replace it. For the former move the mouse over the Action Editor area and press "A" to select all the available frames previously marked. Press "Delete" or "X" selecting "Delete Keyframes" from the options. To over-ride simply pose the character and "Insert" new pose data (press "I"), doing so overwrites previously stored positional data. To create a new action, to the right of the text input field in the Action Editor Header, click the "+" button, the current Action will be duplicated. Left-click the input field to highlight the text and type a new name. Press "Enter" to confirm (as this is a duplicate, it likely contains frame markers that will need to be removed as per the above).

Right-click select the necessary bones for the pose wanted and using the "Rotate" manipulator widget (with "Transformation Orientation" set to "Normal" or "Local"), left-click drag the green, red and blue axis aids to position the bones. Release left-mouse to confirm after each action

The avatar shown ‘before’ in it’s default ‘T’ pose, and ‘after’ in the custom pose for the furniture item – note the avatar is still positioned relative to the mesh and seat node reference
to manipulate a bone right-click to select it then using the “Rotate” transform widget rather than press "R", use the rotate axes to position the bone – for avatars most posing only requires rotational edits
Export The Pose To FBX
Once the pose has been created and marked as an Action in the Action Editor it can be exported to FBX. Exit "Pose Mode", "Ctrl+Tab" or select "Object Mode" from the "Interaction Mode" selector in the 3DView Header, and whilst the Armature still selected, left-click "File » Export » FBX (.fbx)". In the "File Browser" that appears change the file name and location as needed then within "Export FBX" options bottom-left;
- in "Main" enable "Selected Objects";
- in "Geometries" leave "Apply Modifiers" enabled (this doesn’t specifically need to be set for poses as export only includes Action/keyframe data);
- in "Armatures" disabled "Add Leaf Bones";
- in "Animation" optionally disable "NLA Strips" and "Force Start/End Keying".
Finally click the "Export FBX" button top-right. Blender will parse the file and export an FBX of the pose.
Design note: as only data related to the pose is needed make sure to only select the avatar Armature – this will also highlight the active Action sequence in the Action Editor but if more than one sequence exists it will be exported as well as a separate ‘track’ (called "Take" in FBX language).

The final pose in Blender prior to export. Switch to Object Mode from Pose Mode ("Ctrl+Tab", bones highlight orange) and ensure the Armature is selected before then left-clicking "File » Export » FBX (.fbx)". This open the "File Browser"…

… change the file name and save location as necessary then in "Export FBX" properties lower-left make sure "Selected Objects" under "Main" is set…

… disable "Add Leaf Bones" under "Armatures"…

… disable "NLA Strips" and "Force Start/End Keying" in "Animation" then left-click "Export FBX" top-right to export the pose to FBX
Rename The Pose Spot Node
With the Action exported the furniture item needs to be updated to accommodate the pose in Create Mode. As with any furniture the ‘seat[n].*‘ node of a pose spot is where the avatar actually appears in IMVU. For standard (the avatars defaults) ‘sitting’ and ‘standing’ poses this is "seat[n].Sitting" and "seat[n].Standing", wherever these are the avatar can appear. For custom poses however, the "*.Sitting" or "*.Standing" append is replaced with a custom reference, for example "Highbackstand", making the node "seat[n].Highbackstand". This identifies the pose spot and specific seat node as available for a custom pose.
Design note: only "seat[n].*" needs the custom reference append, the other nodes remain untouched except for the sequential numerical reference "[n]" determined by the number of seats there are, i.e., "seat01", "seat02" and so on, the full set in this instance then being;
- "Handle[n]"
- "seat[n].Highbackstand"
- "Catcher[n].Standing"
- "Pitcher[n].Standing"
With the furniture file loaded into Blender, in the 3DView right-click select the node associated with the custom pose, e.g., "seat02.Standing", then in "Object" Properties left-click the input field at the top of the panel ("Object data-block defining an object in a scene") highlighting the text, type the new pose name append after the "." (period) whilst leaving "seat[n]." in place ("seat02." in this instance), e.g., "seat02.Highbackstand". Press "Enter" to confirm.
Design note: knowing which node is associated with the custom pose it can be selected and amended in the "Outliner", simply left-click to select then either press "Ctrl" and left-click, or double-left-click the entry to activate for editing, type to update then left-click elsewhere on screen or press "Enter" to confirm.
Once the node is updated make sure the furniture it set up with the proper hierarchy (everything parented to "Root") then export.

What was originally "seat02.Standing" is renamed "seat02.Highbackstand" ready to accept the custom pose – the change is necessary for IMVU to recognise the pose spot as being different from the standard sitting and standing actions. Select the node and in "Object" Properties left-click the input field at the top of the section and amend the name to include the new custom identifier ("seat[n]." should remain in place)
Export The Furniture To FBX
Before exporting the furniture to FBX ensure the items overall hierarchy is correctly set up and that all object are parented to "Root". Then press "A" and select everything before then left-clicking "File » Export » FBX (.fbx)". In the "File Browser" that appears change the file name and save location as necessary then in "Export FBX" options lower-left, set "Selected Objects" under "Main", "Apply Modifiers" under "Geometries" and disable "Add Leaf Bones" in "Armatures" (other settings remain optionally unchanged). Left-click the "Export FBX" button top-right once done.
Design note: if the mesh has "Shape Keys" animation sequences assigned it’s important to disable "Apply Modifiers" in "Geometries" else the data will be lost on export – for this type of content Modifiers such as "Edge Split", will need to be applied prior to export rather than replying on the export setting to do so. For more detailed information exporting furniture click here.

Export the furniture item to FBX making sure the custom seat node is parented to "Root" ("Root" sits at the top of the hierarchy)

When exporting furniture items with nodes to FBX from "File » Export » FBX (,fbx)" set "Selected Objects" in "Main"…
")
… "Apply Modifiers" in "Geometries" (unless "Shape Keys" are present)…

… disable "Add Leaf Bones" in "Armatures"…

… and (optionally) disable "NLA Strips" and "Force Start/End Keyframing" in "Animation"
Furniture FBX Import & Set-Up
At this point there will be two *.fbx files; the furniture item and the pose.Both now need to be imported into IMVU Create Mode using the "FBX Import" feature. First start IMVU as normal and click "Create" to access Create Mode home page. Click "Derive New Product". In the "Derive a new 3D product" dialogue select "Rooms & Furniture", then "Furniture (12908)". The default chair will appear in the 3D view of "Editor [n]" along with the female avatar (default).
Design note: the fbx import feature doesn’t change the basic derivation and product creation process, it simply provides another pathway to bring assets into Create Mode for use, so projects needs to be started as normal.
In the projects properties panel click the "fbx import" tab (second from the right) then on the "+ Load FBX" button top-left corner of the panel. In the file browser that appears, browse to and select the furniture FBX file, e.g., "highback.fbx", and click "Open" to load into the fbx importer which will then bring the file into Create Mode, displaying a list of elements; "Skeleton", "Meshes" and "Materials". Confirm the importer lists a skeleton, mesh and material (or materials) then click the "Import" button. An "Import Status" confirmation pop-up will appear, click "Import Changes" to complete the import process.
Design note: with the introduction of FBX import attention needs to be paid to ‘scale’. In Blender the default unit of measurement is "None", a decimal system of measurement. On import to IMVU this is typically 100x larger than necessary. To compensate the "Apply scale: 1.0" input field in "fbx import" can be amended by typing "0.01" (1%), which then rescale’s assets to fit. Alternatively during export from Blender, under "Main" the objects size can be changed by altering the "Scale:" value from "1.0" to "0.01" ("Scale: 0.01") . On import to IMVU "Apply scale: 1.0" can be left untouched. For more details on FBX import scaling click here.
Blenders default unit of measurement is 100x larger than the FBX importer needs to the "Apply scale: 1.0" value may need changing to compensate, type "0.01" (approximately a 99% reduction to 1%) when using the standard source and example files
Alternatively when exporting the selected items from Blender the "Scale:" value can be changed from "1.0" to "0.01" ("Scale: 0.01") which down-scales output by 100x to fit the FBX importers expectations


Once the assets are imported and available for use click the "Apply Changes" button to update the scene. The furniture mesh (in this instance a simple high-back chair assigned a basic grey and white checker image) will appear ready for modification or publishing.
Design note: whenever an assets or property has been added, removed or amended "Apply Changes" needs to be used to update the project and apply whatever changes have been made. This is universal to all projects. If upon import the default mesh being replaced is still visible it has not been overridden and will need to be manually removed from the project by selecting appropriate ‘mesh’ entry in "meshes", for example "Mesh 0 / Furniture_chair_toon01", then clicking the "Remove Mesh X" button. Click "Apply Changes" to confirm removal.

Open IMVU and enter Create mode as normal. Generate a "Furniture" project derived from the default chair item, then in the projects properties panel click the "fbx import" tab then the "+ Add" button to load in the furniture fbx file first

In the Windows file browser, browse to and select the furniture FBX file first so this can be set up ready for the pose

When the selected file is opened into IMVU the files components will be listed, in this instance a ‘skeleton‘, ‘mesh‘ and ‘material‘ (one of each). Check all the selected elements exported from Blender are available then click the "+ Import" button (optionally set a ‘scale’ value)

Once the files have been imported click "Apply Changes" to update the scene (when importing, if the "mesh id’s" for the selected items were left as "A – Auto" generated, the default mesh may need to be manually removed, otherwise the item should appear pre-assembled)
Pose FBX Import
With the furniture item set up using the imported FBX assets, the pose file can then be brought in using the same process to add its data to the project. As before click the "fbx import" tab then on the "+ Load FBX" button. In the file browser, browse to and select the FBX file containing the pose (in this instance "highback_pose.fbx") then click "Open". The "Select Skeleton Root" pop-up dialogue may then appear giving the option to select either "../zHead MESHCOUNT: 0" or "../Female03MasterRoot MESHCOUNT: 0". Select "Female03MasterRoot", click "Go".
Design note: the "Select Skeleton Root" dialogue lists the full path as relative to "RootNode/Female03MasterRoot/[armature] [meshcount {n}]".
The FBX file will load into the importer listing the Armature as a "Skeleton" and pose under "Animations/Actions". Before clicking the "Import" button ensure the checkbox to the left of the listed action is enabled, then click. Once the process completes click "Apply Changes" making the pose available for use.
Design note: as with furniture, "Apply scale: 1.0" may need to be amended to "0.01" (approximately 99% reduction to 1%) if using Blenders default Scene properties. For more details on FBX import scaling click here.

After clicking "+ Load FBX" in "fbx import" panel and opening a file, the "Select Skeleton Root" dialogue may appear (determines, and sets, which Armature/Skeleton accompanies the pose data). Select "../Female03MasterRoot" from the list then click the "Configure FBX" button bottom-right…

… the data will then be loaded and displayed in the importer, the Armature under "Skeleton" and the pose under "Animations/Actions". Ensure the action is selected (if more than one is available select the appropriate entry/ies, deselecting those not needed) then click "Import" to bring the data into IMVU for use. Click "Apply Changes" to update the project
Add An Action
Once the pose FBX has been imported and changes applied it can be assigned to the furniture item. First click the "action" tab. Its blank by default. To populate click the "+ Add" button top-left of the section. A set of properties and options will appear. At the top (the pale-blue section) are some global settings, these define the behaviour attributed to the overall action. Below (the pinkish-orange section) is where the actual pose is added and properties modified.
Design note: the upper section controls the overall action as a unit of grouped behaviours, the section below individual animations, either as static poses or motion sequences. This allows each action to hold multiple animations sequences or poses which can be set to cycle though in various ways, that once completed is then replayed based on the actions overall settings.
In the lower section click the "Skeletal Animation" drop-down and select the now available *.xaf file, in this instance "T-Pose.xaf". In "Composition" select "Replace", which forces a hard-transition from whatever sequence may be playing into the selected pose (the sequence is played explicitly as is rather there being a ‘soft’ or ‘blended’ transition from one to the other).
Design note: optionally set "# loops", "Loop start" and "end" if the specific sequence is to be replayed a fixed number of times ("# loops" set to "0" repeats infinitely).
In "Action Parameters" set the "Trigger:" property to activate the pose, this can be a specific word or phrase users type in chat to activate the action, or a ‘command’ that automatically starts the pose when the spot us used. For furniture items the latter is more useful, the command for which is "stance.[seat node name]", in this instance "stance.Highbackstand", "Highbackstand" being the text appended to the seat node "seat02." placed behind the chair. Set the "Type:" to "Avatar" and then type a numerical value in "# ensembles played" based on the number of times the overall sequence is to be played. In "After Playing", if there is just a single animation, select "Play same Ensemble". Finally click "Apply Changes" and test. If set up correctly the pose will activate the moment the Handle spot is click the avatar moves into position. Save the file and upload.
Design note: for finite playback type any number, the duration then being the time it takes for the selected animation to play through the selected sequence (number of frames per second) multiplied by the number of times the overall action is to loop (as set in "# ensembles played") – a 1 second animation set to loop ten times will play for ten seconds. For infinite looping type "0".

Once the pose data is imported into the scene and changes applied it can be added to the furniture item by first adding an "action", click "+ Add"…

… which will populate the panel with a number of different properties and options. In the "Skeletal Animation" sub-section click the drop-down and select the now available *.xaf file, in this instance "T-Pose.xaf". Select "Replace" under "Composition" and set the "Loop start" and "end" frames where needed. To make the pose active when the spot is used set the "Trigger:" to be "stance.[seat node name]" and "# ensembles played" to "0" to loop infinitely
The finished item with custom pose added to the furniture, triggered when the User clicks the pose spot Handle marker
Video
Overview adding custom avatar poses to IMVU furniture items in Blender.
[Duration 5 mins] how to make custom poses for IMVU furniture in Blender

