Make Normal Maps From Photographs
This tutorial will run through some of the things you need to be thinking about when making normal maps directly from photographs; that is, using photographs as a direct source for creating a ‘source’ image to pass through various normal mapping tools.
This is especially useful in instances where recreating a heightTemplate may be impractical or not possible as per the previous tutorial of making normal maps from photographs here and the use of a photograph as a basis more convenient.
Photographic Tips for Normal Mapping
One of the big problems you’ll find with the way people generally take photographs is that they do so without any regard to their eventual use as textures. What this means is that shots are taken without any regards to the prerequisite that would-be textures generally need to have; mainly to do with limiting the amount of work a texture artist needs to do with the artwork in order to effectively convert it into a usable asset. This is one of the reasons why it’s not a good idea to use images found on the Internet as they’ve not been taken correctly.
Some general tips to think about when taking your photographs;
Flat Light – overcast daylight
Generally speaking if you’re able to take your own photographs for texture use you need to be looking to take them in such a way as to have the subject lit with a relatively flat light – nearly every image you see on photo resource sites don’t do this and it’s tedious and time consuming to correct. What this means is that you actually want to be taking photographs on overcast days (no rain unless you need the ‘wet’ look), either overcast because it’s going to rain or overcast due to low cloud; any condition in which you effectively get a flat ambient light (the sun’s strong directional lighting in minimised whilst you still get enough light coverage to see what you’re looking at).
Doing this (whenever possible) means the subject your photographing will be lit by a none-directional light, as much as possible (outside of a studio setting); this flattens highlights and reduces the depth of dark areas and the often harsh directional dark shadows cast by strong sunlight.
Flat Light – shaded daylight
If it’s hard to take photos in overcast conditions (you live in LA where the sun always shines!) then look to take photos in the shade; whilst not nearly as good as overcast conditions the resulting photographs more often than not won’t have any of the problems associated with taking photos in direct sunlight – strong shadows/lights. You can create your own shade by standing in front of the subject.
Harsh light – flash photography
Avoid using flash photography where ever possible as the methods that can be employed to reduce the glare caused by the use of a flash will often destroy the detail in an image – using the high-pass filter to reduce ‘contrast’ in an image doesn’t work too well with photos taken with a flash because the contrasts between the flash ‘spot’ and the darker parts of a photo are to high to get optimal results.
Long exposure times (& tripods)
You can get around the need to use a flash by setting up a tripod – whenever you can – and using a long exposure timing on the camera.
Base Image Composition
When taking your photographs it’s best to take a number of shots from different angles – the reason being that no matter how hard you try, if you only have one photo source you will get pattern repeats that are difficult to avoid or disguise; taking several shots from slightly differing angles means being able to use a larger sample source when cloning to create a more complete image for use as a texture base.

Stage 1 : The base photograph from which the normal map will be generated
The image above is the original photograph that will be used to create both the diffuse layer and the heightTemplate from which the normal map will eventually be generated. The flat light in which the photograph was taken helps prevent too many obtrusive dark shadows being present where they wouldn’t represent ‘depth’ (as the normal map tools will see it).

Stage 2 : adding further layers of photographs
Cloning or copy/pasting sections from some of the other photographs into the working texture file allows greater coverage of the image space with more unique features, even using the clone tool now would give better results than trying to over use the original photographs features. All this work forms a base source image from which the actual texture will be ‘cut’.

Stage 3 : Final photo layers and image clone usage
Once done you should end up with something that doesn’t have any overly noticeable tiling or pattern repeat; depending on the final textures placement and use, it may need more tweaking to hide any obvious feature repeats (slight tonal changes are not noticeable on their own, but tile a texture across a large surface and the difference and pattern repeat become all to noticeable – which can be difficult to hide when in use.
Active Texture Area
Once a base source is create a section of it will then be used to create the actual texture space, a 512 x 512 pixel image in this case. Some further work will be needed to ensure the image tiles correctly without any ‘edges’ showing. Additional tonal or colour work can also be done at this point the result of which should be a ‘made ready’ (diffuse layer) image.

The tiling texture space
Desaturation & Image Editing
Because the lighting conditions under which the original photographs were taken it means that when the next step is done in this process it produces a greater degree of fidelity relative to the actual structure of the object (in this case tree bark) due to the absence of heavy(ier) directional shadows cast due to the presence of strong sunlight; this basically means dark areas actually represent depth instead of ‘shadow’ which normal map tools can’t process in the way we understand them.
Design note: Always keep in mind that normal mapping tools can’t assess depth the same our eyes/brains do; we know something can protrude a surface and still be in dark shadow, it’s impossible for the various normal mapping tools to do that same – black is depth, white is height.
Desaturating or removing all the colour tones to produce an image similar to below should be done before passing images through normal map tools so as to avoid colour being mistaken for depth tone; the image need to be tonally correct relative to what is expected so dark colours may need adjusting so that they represent the surface structure correctly – painting the protrusions of an object with black would result in the tools thinking those surfaces are recessed.

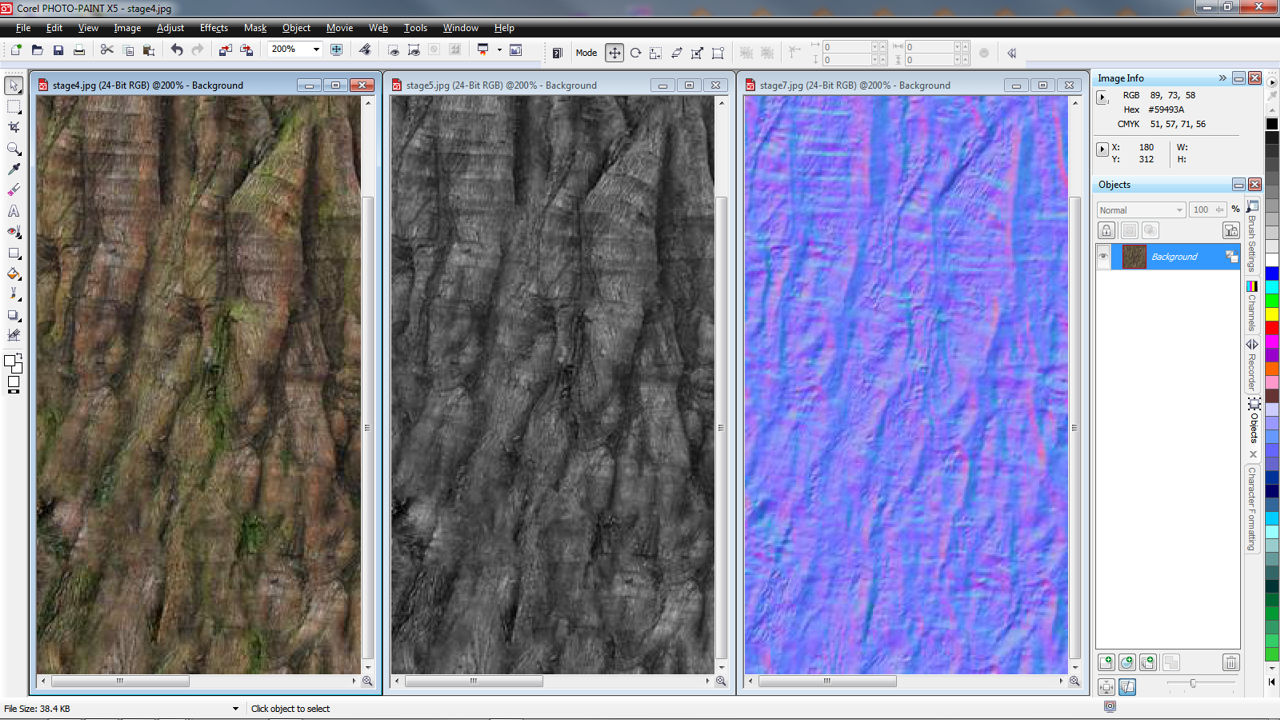
Image desaturation to arrive at a usable grayscale image for normal mapping
Normal Map Creation
Once you have the gray scale template image it’s time to pass it through the normal mapper. Depending on which one you use – CrazyBump, nVidia, AMD (formerly ATI), GIMP (now natively supported) or some other 3rd party tool – the results of passing the template through will vary, in some cases quite dramatically.
Whichever normal map tool is used, and whatever the results, because of the attention given when taking the original photographs of the source tree bark as well as subsequent image editing, the end result will be a normal map texture that is more correctly interpreting the template and more closely corresponds to what is expect to be seen relative to height and depth; the fidelity is better because of the time taken to ‘get it right’ from the beginning.
Design note: If you’re not happy with the results of passing the template through the tools you can always layer up normal maps in your photo editing software to get better results. Create a few different versions of the template and pass those through the generators, once a few normal maps have been created they can be layered and edited to combine or remove features as required.

The resulting normal map created from a photograph of tree bark after being passed through a normal map generator
Conclusion
A good deal of problems that occur when making normal maps from photos stem from the use of low quality original images, usually sourced from the internet. Aside from issues over copyright, images sourced in such a way are, almost without exception, the worst type of material that can be used due to issues related to compression and format – normal mapping tools will pick up and emphasise compression artefacts that aren’t always removed during the process of texture making, often resulting in lines and blocks appearing on the final images. To avoid all the inherent problems associated with using poor quality, low resolution images it’s always best to source the directly by taking the photographs yourself, or by using large (full size) originals where-ever possible.

